Sunday, February 10, 2013

Strawberry Cheesecake Green Smoothie + Green Smoothie tips


Tired of hearing about green smoothies? Yeah, so am I. BUT WAIT! They are the easiest way for me to get a ton of greens down in one sitting. I've been making them for many years. I started making them in my food processor because my blender just couldn't handle it. Now we use a Cuisinart blender and it has changed my life. I don't see the day coming anytime soon when we can afford a Vitamix, so if you're like me, you need to figure out how to make them in your blender.

Tips about greens:

1. Use spinach if you are a beginner. Spinach is cheap and doesn't disturb the taste of the fruit in your smoothie very much. When you're ready to branch out, start adding a little variety of greens like kale or chard.
2. If you use lettuce, you will probably be able to taste it.
3. Kale works best if you stuff your blender full of kale, add enough water to cover the kale, and then blend just the kale and water up first before adding anything else. Same tip applies for swiss chard.
4. If you like the green ice cube method- (which I don't because I don't know exactly how much spinach I'm consuming and something about breaking down the spinach and freezing it makes me think I've destroyed the goodness) Try to use about a 6:1 ration. 6 cups of spinach, 1 cup of water.

Tips for a delicious green smoothie:
1. Don't be afraid to add a lot of fruit at first. As you get used to the taste, start adding less and less fruit until you are accustomed to a greener taste.
2. Frozen bananas help give the smoothie a nice, creamy consistency.
3. Frozen fruit works great because it keeps the smoothie cold and creamy. If you use fresh fruit, don't worry about cutting off the leaves, peeling, or removing the core.
4.  Make it big enough to fill you up! My green smoothies are usually between 26-32 ounces.
5. Nut butters and Greek yogurt are a great way to beef them up with some protein.
6. If your blender is having a hard time blending, just continue adding a little liquid at a time until it stops getting stuck at the bottom.
7. Be patient! Making a green smoothie in a blender takes some time. Let it run and run and run until it has reached a smooth consistency.
8. If you have a food processor, try using that if your blender tends to get clogged with fruit at the bottom.
9. Get creative!
10. Don't be shy with the greens- add 3 huge handfuls to each smoothie.

My favorite combos:
1. Banana + 2 pears + 1 C strawberries
2. Blueberries + almond butter + banana
3. Peaches + orange juice + strawberries
4. Banana + strawberries + Greek yogurt
5. Banana + peanut butter + cocoa
6. Strawberries + frozen cranberries + frozen raspberries

Strawberry Cheesecake Green Smoothie 


  • 3-4 handfuls of spinach or 3-4 cups of kale
  • 1 frozen banana
  • 2 cups frozen strawberries or fresh strawberries with stems intact
  • 1/3 C Greek Yogurt (I recommend Fage for it's superior taste and protein content)
  • dash of pure vanilla extract
Instructions:
  1. In your blender, combine spinach/kale with enough water to blend it up. After greens are sufficiently blended with water, add fruit, yogurt, and vanilla. Blend. Blend. Blend.  


Saturday, February 9, 2013

200 calorie Peanut Butter-Chocolate bowls

I grew up with parents who went through different phases of collecting things. During one phase, they collected antiques from the 50's. ANYTHING that said Coca-Cola ended up in the collection. At one point, my dad found an old soda fountain counter complete with spinning stools. This went in our small basement, much to our delight.

My parents also installed a vintage candy machine. I knew where they hid the key and ate Reese's Peanut Butter Cups without paying for them. 3rd-4th grade was awesome. Unlimited Peanut Butter Cups and Corn Nuts!

This old metabolism of mine couldn't handle those PB cups then and certainly can't handle them now.

My love of PB and chocolate knows no bounds. I invented this little snack to fight off the munchies. I usually make one around 10:30 am or 3:00 pm to hold me over in between meals. It packs the necessities- fiber, protein, and fat- for only 200 calories! Say goodbye to granola bars and fiber-you know the number products. (It's one in case you didn't know the number).  This will give you some great nutrients including antioxidants from the dark chocolate cocoa and keep you satisfied until your next meal.

 Ingredients:
1/4 C Old Fashioned Oats (Not the instant kind)
1 Tbsp Peanut Butter
1/2-1 tsp cocoa (If you don't like a strong dark chocolate taste, add less)
1-2 tsp honey, depending on taste

Instructions
1. Add ingredients to a microwave safe bowl. Microwave for 15 seconds. Stir. Microwave for an additional 5-10 seconds if needed. Peanut butter should be almost liquid. Stir again.

2. EAT. 

ALMOND BUTTER VARIATION:


Ingredients:
1/4 Old Fashioned Oats
1 Tbsp almond butter (Learn to make your own coconut almond butter here)
1 tsp honey (I used coconut flavored honey, but any regular clover will work)

Instructions
1. Add all ingredients to microwave safe bowl. Microwave for 15 seconds. Stir. Microwave again for 10-15 seconds or until almond butter is thin enough to stir into the oats. Final product will be course and kind of crumbly. 

2. EAT. 


Friday, February 8, 2013

One time, when we were broke...

Have you ever had a drastic change in your income? Not to get all awkward with finances, but holy crap, it's an adjustment to go down to one income. My sweet carb-loving husband is in an accelerated nursing program so I am the breadwinner! I'm barely winning any bread though. I work for a non-profit university and I am so grateful for my job, but we are REALLY having to tighten up our spending if we're going to survive my husband being in nursing school.

1 month down, 15 left to go! We can do it.

I've also been in a food blog rut. I am afraid that no one will want to eat the food I'm eating, so...why post about it? I have drastically cut back on treats, desserts, and eat your feelings food. I don't even really make food that masses of people would want to eat.

I am giving myself one year to let go of as much excess weight as possible. In order for that to happen, I need to eat CLEAN and LEAN. (Secret- I actually hate the term "clean eating"...)

Here's the deal. I will spend the next few months sharing what foods work for me and how to eat CLEAN and LEAN and SIMPLY on a budget. Can we still be blog friends if I do that? I hope so :)

I make this at least twice a week. As long as I remember to put my cashews in a bowl of water before I'm ready for lunch, it comes together in about 3 minutes! That's less time than it takes to open up a can of soup and cook it. It's very flavorful and creamy not to mention VERY good for you and your budget. Enjoy!


Decadent Zucchini Soup, serves 1. Taken from "The Good Life Coalition" Lighten Up! recipe book.

Ingredients:
1 large zucchini or 2 small zucchini, unpeeled
1/4 C cashews, soaked in water for 20 minutes
1 Tbsp Bragg's liquid aminos
1/4 tsp garlic powder
Dash of salt

1. Chop the zucchini. Microwave for 1-2 minutes, or until it is steaming. Add all ingredients including cashews (drain water first) to a blender and blend until smooth.


Monday, January 21, 2013

Strawberry Pumpkin Seed Salad

I am so excited to welcome myself back to my blog with this amazing salad recipe. 2013 is all about rediscovering myself. I've had my ups and downs with my devotion to nutritious food. I've always loved healthy food and recipes. I've always loved reading and learning about the POWER of food. It's just that sometimes I want to eat what everyone else is eating! I want pizza and french fries and cake. Lots of cake with lots of frosting...

 It's time to get back to what I really love and believe in for 2013. This salad comes from my recipe book from a program I'm doing right now. The Good Life Coalition's Lighten Up Program speaks to me on so many levels. The best part is that it came with over 100 recipes! I am loving the food on this program.

The pumpkin seeds are toasted and then tossed in honey and coconut oil so they are sweet and crunchy. The strawberries and Poppyseed dressing make me feel like I'm eating at Zuppas! Here is just a hint of the kind of food I get to eat everyday.


Ingredients: (serves 1)
1 small sheet of parchment paper
2 Tbsp raw pumpkin seeds (hulled)
1 tsp coconut oil
1 tsp honey
1/2 head red leaf lettuce (I used romaine, spinach, and spring mix)
1 green onion, sliced thinly
1/2-1 cup fresh strawberries, sliced

Poppyseed Dressing: (serves 8)
1/2 cup extra virgin olive oil
6 Tbsp organic red wine vinegar
2 tablespoons honey
2 tablespoons poppy seeds or chia seeds
1/2 teaspoon high-mineral salt

Instructions:

1. Set some parchment paper out on the counter. Heat a small skillet over medium heat. Add pumpkin seeds and roast 2-3 minutes until they begin to turn golden, but before they begin popping. Remove from heat and stir in honey and coconut oil. then transfer to parchment paper, spreading them out to cool and dry while you prepare the salad.


  Toss together lettuce, green onions and strawberries. Prepare the poppyseed dressing by adding everything to a small jar and shaking well.

When pumpkin seeds are completely cooled and dried, crumble them over the top of the salad, and top with the poppyseed dressing. 


Thursday, December 6, 2012

BRB!

I had all these great Christmas food posts ready to go when I got a notification that my Picasa account had exceeded its free storage space limit and so I couldn't upload any pictures to my blog. WHAT??

I'm not too cheap to pay $2.49/month, but I also don't know how every single picture from facebook and iphoto got synched with my Picasa account.

We are in the process of moving to Boise Idaho and so for the next month I've decided to take a break from blogging and I'll catch up with you all in January. This will give me some time to figure out the Picasa thing and also some time to prepare what I REALLY love posting about- GRANOLA CRUNCHER HIPPY FOOD! Sure, I love sweets, who doesn't? But January is the time of year when everyone starts dialing back on the pigging out, so stay tuned for some great healthy recipes for the 2013.

Merry Christmas!

Saturday, November 24, 2012

Guest Post at Blissful and Domestic

I'm so excited to share this link with all of you! I was a guest poster over at Blissful and Domestic today. Go check it out here!

Saturday, November 10, 2012

Buttermilk Oven Fried Chicken


Do you remember when KFC was actually called Kentucky Fried Chicken? I remember it being a real treat to get KFC, go to the park, and have a huge picnic with my family. My dad loves fried chicken from the deli and we had a lot of summer picnics with fried chicken.

Fried chicken also always look so good on TV...everytime I watch "Man vs. Food" going to some place that makes fried chicken it makes me want to buy a deep fryer for my kitchen. That will probably never happen, so here is an enlightened, but delicious version of fried chicken.

Another hit from Cooking Light, this recipe uses cracker meal for the breading which is genius. This is a hit with bone-in chicken but you can also use boneless skinless chicken breasts if that's all you have on hand. This is a delicious "fried" chicken you can feel pretty awesome about serving since it is briefly pan-fried and then baked to perfection in the oven. The chicken tastes like the real-deal fried chicken without all the fat. I served mine with a green salad and roasted carrots with rosemary.

 Ingredients:
1 cup lowfat buttermilk (Make your own with 1 C milk, and 1 tbsp vinegar OR lemon juice, let stand 10 min)
4 bone-in chicken breast halves, skin removed, about 8 ounces each
1/3 C all-purpose flour
1/3 C cracker meal made by food processoring (or ziploc bag and roller pinning them) about 10 saltine crackers until finely ground
1/2 tsp salt
1/2 tsp freshly ground black pepper
2 Tbsp butter

1. Preheat oven to 425

2. To prepare chicken, combine buttermilk and chicken in a shallow dish, turning to coat.

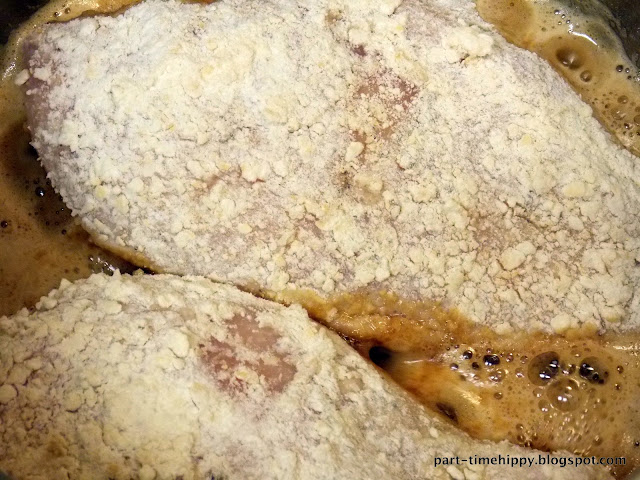
3. Combine flour and cracker meal in a shallow dish. Transfer chicken from buttermilk to a work surface. Sprinkle chicken evenly with 1/2 tsp salt and pepper. Working with one chicken breast half at a time, dredge chicken in flour mixture, shaking off excess; set aside. Repeat procedure with remaining chicken and flour mixture.

4. Melt butter in a large ovenproof nonstick skillet over medium-high heat. Add chicken to pan, meat side down; cook 4 minutes or until golden brown. Turn chicken over, and bake at 425 for 32 minutes or until a thermometer registers 165. If you don't have an oven proof skillet, just transfer the chicken to a baking dish for the oven cooking step. Serves 4.


Printable Version