Monday, January 30, 2012

1950's Rich Waffles


When I say Rich Waffles around my husband, he starts drooling and then he starts asking what he can do to help me make them. Since I am dedicating the next several recipes to my sweetheart, this one is for him. These are by far his favorite waffles.

I found this recipe in my 1950's Better Crocker cookbook and although it suggests using bacon fat for an even richer taste, I usually follow the regular richer instructions which call for an extra egg and extra Crisco, just cause we like to eat healthy at our house :)


These waffles should be served at a fancy restaurant. I would serve them to the President if he came to my house for breakfast. They really are rich. I've never had a waffle that compares. Not even the special malt waffles I used to eat at the 4-star ranch I used to work at compares to these.

Don't think about it, just make them for breakfast, or for a late night snack and I promise you that you won't be disappointed.

Ingredients:

3 Eggs

1 1/2 C Buttermilk

1 tsp baking soda

1 3/4 C sifted flour

2 tsp baking powder

1/2 tsp salt

1/2 C melted shortening. That's right, pull out the tub-o-Crisco. (The cookbooks says "Fresh bacon fat is good in waffles.")

Instructions:

1. Beat eggs well.

2. Beat in the remaining ingredients.

3. Pour batter into heated waffle iron. Makes 8 waffles. Now go impress your family with your waffle skills.


Printable Version


Thursday, January 26, 2012

Dan's Chicken Roll Ups


One time I was trying to bridge the gap between my husband's favorite foods and my own favorite foods. He is a self-proclaimed vegetable hater and I am a lover of vegetables. He hates spicy, I love my nose to run when I eat curry. I hate boxed dinners, he loves Velveeta shells and cheese. What's a girl to do? I called my mom.


I called my mom and my grandma and wrote down every recipe that involved bread, white creaminess, cheese, and one or two vegetables. I am crazy about my husband and have found out he actually likes more foods than either of us originally thought!


This recipe series is devoted to him. He makes me laugh from the moment I wake up until the moment I fall asleep. If these chicken roll ups make him happy (I admit I can eat more of these than him because they are SO delicious) then I will fore-go my veggie medley surprise just for him. Love you babe!


This recipe is a combo of my mom's and my favorite food blogger's, The Girl Who Ate Everything

Ingredients:
Filling:

8 ounces cream cheese at room temperature

1/2 C sour cream

1/4 tsp pepper

1/2 tsp salt

1 1/2 Tbsp dried chives

1 1/2 Tbsp minced onion

2 stalks chopped celery (for veggie lovers)

2/3 C chopped or canned mushrooms (for veggie lovers)

3 C diced cooked chicken breasts


Roll Ups:

2 (8 ounce) cans of Pillsbury crescent rolls

1/4 C melted butter

2 C Italian seasoned bread crumbs


Gravy:

1 can (14.25 ounce) cream of chicken soup

1 package chicken gravy mix

3/4-1 C water


1. Preheat oven to 350 degrees. With a hand mixer, combine the cream cheese and sour cream until smooth. Add salt, pepper, dried chives, minced onion, celery, mushrooms, and diced chicken and stir until all smooth and creamy.


2. To assemble your roll ups, roll out the crescent roll triangles until they are as wide and long as possible. Fill each roll with 1/4 C of the filling and then tuck the sides around the filling and roll up towards the skinny end of the triangle, tucking as you go.


3. After rolling, dip the tops and bottoms in melted butter and then roll them around in a bowl of bread crumbs to get that yummy crunchy coating. Shake off any excess crumbs. Line them up on a greased cookie sheet as you go.


4. Bake at 350 for 20-25 minutes until golden brown.

5. Prepare the gravy in a small pot on the stove. Combine the cream of chicken soup, the chicken gravy, and 3/4-1 C water. Bring to a simmer and then keep warm until you are ready to serve warm on top of the chicken roll ups.


Printable Version


Tuesday, January 24, 2012

Paleo Banana Walnut Muffins


So I'm totally diggin this Paleo thing. I'm not a pro, but I'm learning as I go and it's been a really good thing for me. In one of the books I have about Paleo eating, the author says that with today's technology, one can take nuts or other foods like coconut and grind them into a "flour" and then be combined with other ingredients to create baked goods and that these kinds of foods are very easy to abuse. I think he was suggesting to avoid trying to recreate things like cupcakes, muffins, cookies, and such with nut flours because they really don't fall in line with the philosophy of a Paleo lifestyle.

I agree. They are easy to abuse and tonight I abused these muffins. There are 8 remaining, but there were 12 earlier today. All I can say is Halle-freekin-luia I found these! I've made 2 other muffin recipes and they were so gross that even my fellow hippy-food-lovin friend couldn't finish it.

These tasted like butter to me. They seriously tasted like a delicious buttery muffin. I am so pleased with them that I will make them again. They are so convenient for me because I eat most meals in my car. (lame, but true)

These are adapted from 3 different Paleo Muffin recipes, so I give credit to the the wonderful world wide web.

Ingredients:

2 Brownish Bananas
3 Eggs
1/4 C Olive Oil
1/2 tsp Salt
1 tsp Baking Soda
1 Tablespoon Honey
1/4 C Coconut Flour
1/2 C Walnuts

Directions:

1. Preheat oven to 425. In a mixer, combine the two bananas, eggs, honey, and olive oil.

2. Next, Combine the salt, soda, and coconut flour. Add the flour mixture to the wet ingredients and mix on low until just combined. Fold in the walnuts.

3. Scoop about 2 Tbsp of batter into a muffin pan that has been heavily coated in cooking spray or lined with cupcake liners. 

4. To prevent burning, place the muffin pan on top of a cookie sheet and then put them in the oven for about 8-10 minutes. Every oven is different so keep an eye on these! Cool on a wire rack.

Printable Version


Monday, January 2, 2012

Paleo Friendly Thai Coconut Chicken Soup


January 1 is notorious for people starting their diets and since I hate following a crowd, I started mine on December 30.

I realize I have already lost a few readers by including the word Paleo in the title, but since I'm trying to follow the Paleo lifestyle for the next 90 days (at least) I figured this would be a great place to keep track of recipes that have worked for me.

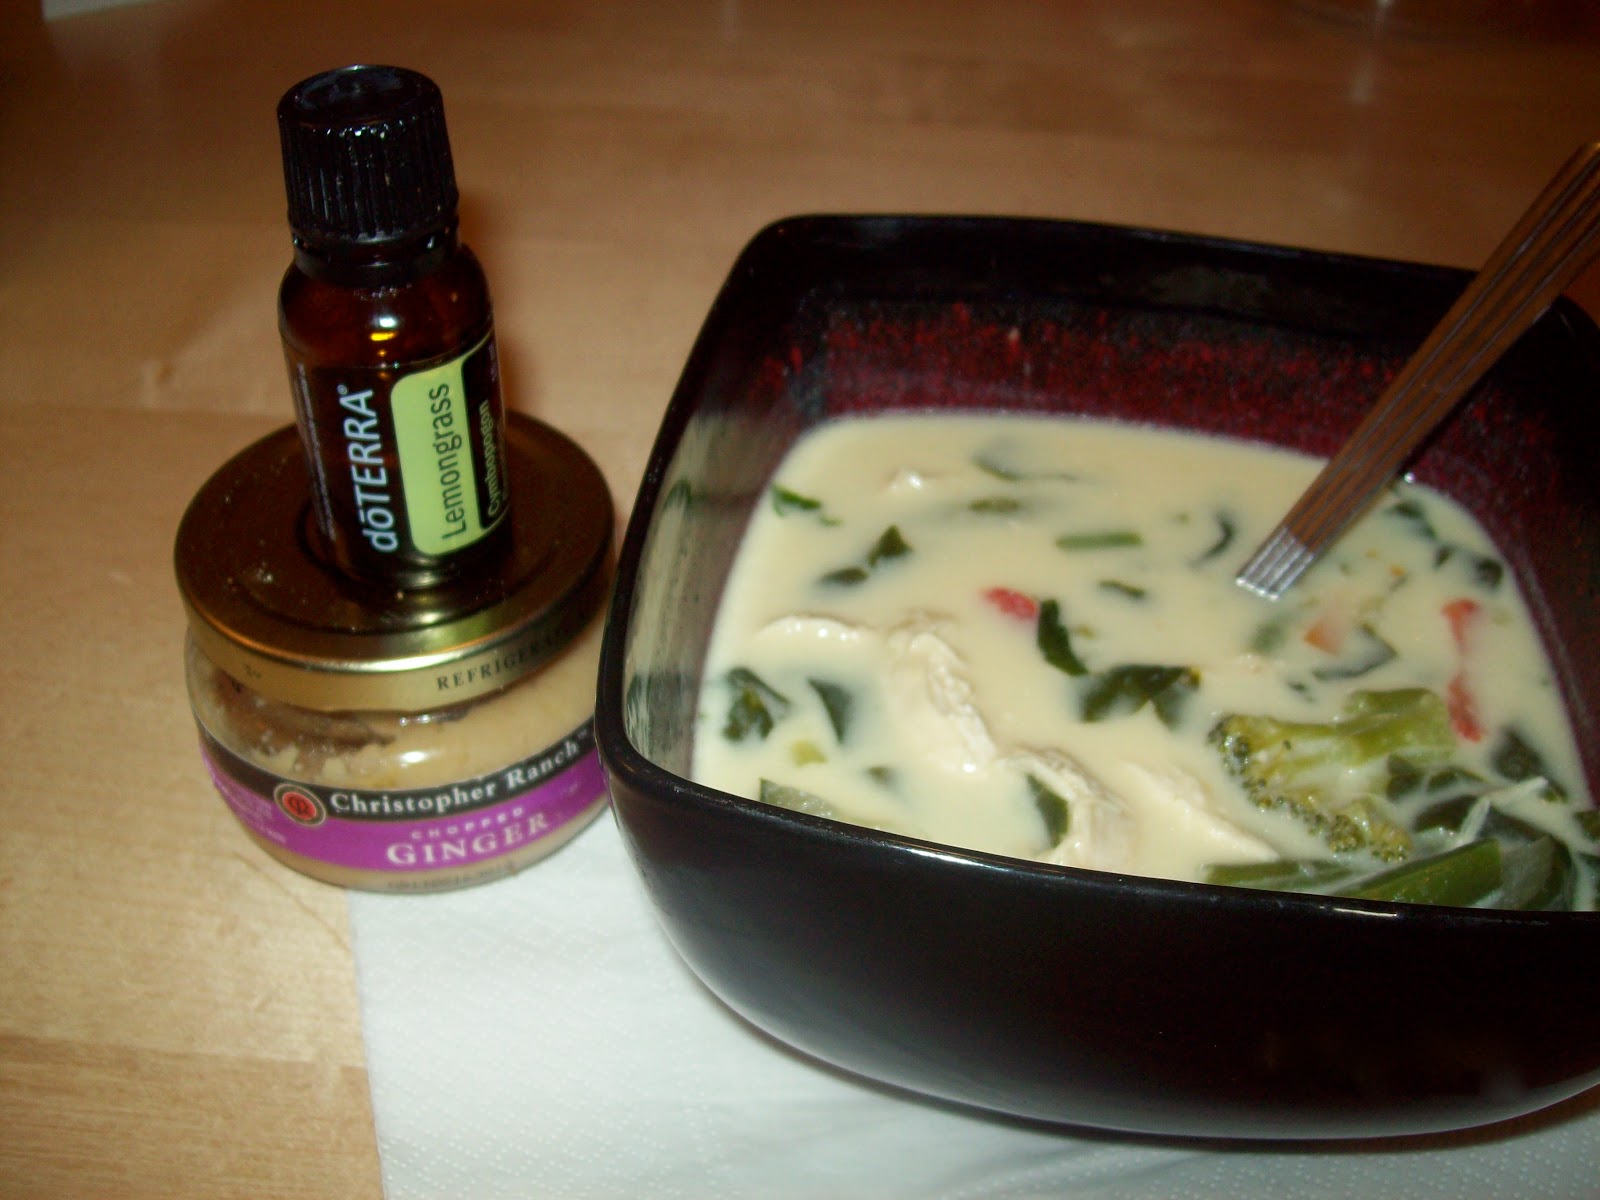
I love that I got to cook with my doTerra essential oils! The first and only time I tried to chop my own lemon grass was 6 years ago and haven't touched the stuff since. I have lemongrass oil and decided to use my oil in this recipe to replace the lemongrass.


This soup is so rich and filling that I couldn't even finish my bowl. It could easily be made with what you have on hand. I just used the veggies I had on hand instead of what the original recipe called for. This is definitely going in my "make again" category.

Adapted from this recipe on the Paleo Periodical.

Ingredients:

2 boneless skinless chicken breasts
kosher salt and fresh ground pepper, to taste
1-2 C frozen stir fry veggies, I like the bag from Costco
2 cups baby chopped baby spinach or other greens like swiss chard
1 drop doTerra lemongrass essential oil or 2 Tbsp. lemongrass
2 Tbsp. ginger, minced
1 can coconut milk
3 cups chicken broth
2 Tbsp. fish sauce
1 tsp. chili-garlic sauce 
3 Tbsp lime juice or the all the juice from a fresh squeezed lime
1 bunch green onions, sliced
1/4 cup basil, chopped
1/4 cup cilantro, chopped

Instructions:

1. In a large saucepan, boil uncooked chicken breasts in the 3 C of chicken broth until cooked all the way. Remove them from the pan and shred them.  Return the shredded chicken to the pan and add the can of coconut milk, turning heat to medium.

2. Stir in frozen veggies, chopped spinach, ginger, fish sauce, chili-garlic sauce, and lemongrass oil and simmer for about 20 minutes.

3. Add chopped green onions, basil, and cilantro and lime juice just before serving. Serve in large bowls.

Printable Version 

Tuesday, December 6, 2011

Sugar Sludge Salad


I have to give my awesome sister-in-law FULL credit for this recipe. I think it rivals the Cafe Rio salad in terms of wanting it over. And over. And over. And over again.

I have had similar salads at parties, but there is something about the combination of ingredients of this salad that make it the best. It has tart green apples, salty cashews, crisp romaine, and a poppy seed dressing that is to die for.

If you have a party coming up, this one will definitely be a hit! It is my new favorite party salad. Don't worry, it's not on your diet, but eat it anyway because it's that good.


Ingredients:
Salad:
1 head Romaine lettuce, chopped
2-4 C spinach leaves ( As much as you'd like, no science here)
1 pound Muenster cheese, cubed (Muenster is the BEST, but I have been known to sub Mozz.)
1/2 C cashews
1-2 tart apples, cubed

Dressing (This makes a ton of dressing for later!)
3/4 c. sugar
1 tsp. dry mustard
1 tsp. salt
1/3 c. apple cider vinegar
1/2 T. chopped onion
Blend above then slowly add 1 C. vegetable oil
Add 1 1/2 T. poppy seeds before serving


Instructions:
1. Combine lettuce, spinach, cheese, cashews, and apples in a large bowl. Slowly drizzle dressing over salad until lightly coated. You will probably have enough dressing for 1.5-2 salads so don't be alarmed if you don't use it all. Toss well to coat evenly and enjoy!

Printable Version

Thursday, December 1, 2011

UNDER CONSTRUCTION

This blog is under construction, Please be patient as I figure out what went wrong to mess everything up!

Tilapia with Capers & Grilled Asparagus with Caper Vinaigrette


I stopped buying fish from grocery stores for awhile because it didn't taste like real fish to me. THEN. My good friend Beth who is one of the healthiest and creative people I know made me some of the most delicious Tilapia I had ever had. She brushed it with olive oil, sprinkled it with sea salt and a little no-salt Mrs. Dash (Garlic and herbs blend) and then wrapped it in tin foil and cooked it on the BBQ grill. I think the secret to this success was high quality Tilapia, and hers had come from Costco.

The next Day I went to Costco and bought a bag and have been SO happy with the quality of the Tilapia. The filets are really meaty and flaky.


Nothing goes better with fish than ASPARAGUS in my opinion and nothing compliments fish better than CAPERS so put on your happy pants because these two recipes combine all the forces of delcioso-ness!

Ingredients For Tilapia:

4 Tilapia filets

3 Tbsp Extra Virgin Olive Oil

3 Tbsp Lemon Juice

1 1/2 Tsp Garlic Powder

1/8 Tsp Salt

1/2 Tsp dried Oregano

1/8 Tsp Paprika

2 Tbsp capers, drained

Instructions:


1.Preheat oven to 425.

2. Place Tilapia filets in a shallow baking dish.

3. In a small bowl, combine olive oil, lemon juice, garlic powder, and salt. Brush the filets with this mixture so that the garlic powder can adhere to the filets.

4. Next, pour the remaining olive oil mixture over the fish, sprinkle with remaining seasonings and top with capers. Cover with tin foil. Bake for 10-15 minutes or until the fish is tender and flaky.

Ingredients for Asparagus:

1 1/2 pounds asparagus spears, trimmed

3 Tbsp extra-virgin olive oil

1/2 tsp salt

Cooking spray

1 Tbsp red wine vinegar

1/2 tsp Dijon mustard

1/4 tsp freshly ground black peper

1 clove of garlic, minced

2 tsp capers

1/4 small basil leaves

Instructions:


1.Spray a large cookie sheet with cooking spray. Arrange the asparagus over the cookie sheet.

2. In a small bowl, combine all ingredients except basil. Brush the asparagus with vinaigrette until evenly coated. Top with basil leaves.

3. Bake for 10-15 minutes in a 425 degree oven, uncovered.

Drizzle everything with fresh lemon juice before serving.

Printable Version