I had all these great Christmas food posts ready to go when I got a notification that my Picasa account had exceeded its free storage space limit and so I couldn't upload any pictures to my blog. WHAT??
I'm not too cheap to pay $2.49/month, but I also don't know how every single picture from facebook and iphoto got synched with my Picasa account.
We are in the process of moving to Boise Idaho and so for the next month I've decided to take a break from blogging and I'll catch up with you all in January. This will give me some time to figure out the Picasa thing and also some time to prepare what I REALLY love posting about- GRANOLA CRUNCHER HIPPY FOOD! Sure, I love sweets, who doesn't? But January is the time of year when everyone starts dialing back on the pigging out, so stay tuned for some great healthy recipes for the 2013.
Merry Christmas!

Thursday, December 6, 2012

Saturday, November 24, 2012
Guest Post at Blissful and Domestic
I'm so excited to share this link with all of you! I was a guest poster over at Blissful and Domestic today. Go check it out here!
Saturday, November 10, 2012
Buttermilk Oven Fried Chicken

Do you remember when KFC was actually called Kentucky Fried Chicken? I remember it being a real treat to get KFC, go to the park, and have a huge picnic with my family. My dad loves fried chicken from the deli and we had a lot of summer picnics with fried chicken.
Fried chicken also always look so good on TV...everytime I watch "Man vs. Food" going to some place that makes fried chicken it makes me want to buy a deep fryer for my kitchen. That will probably never happen, so here is an enlightened, but delicious version of fried chicken.
Another hit from Cooking Light, this recipe uses cracker meal for the breading which is genius. This is a hit with bone-in chicken but you can also use boneless skinless chicken breasts if that's all you have on hand. This is a delicious "fried" chicken you can feel pretty awesome about serving since it is briefly pan-fried and then baked to perfection in the oven. The chicken tastes like the real-deal fried chicken without all the fat. I served mine with a green salad and roasted carrots with rosemary.
Ingredients:
1 cup lowfat buttermilk (Make your own with 1 C milk, and 1 tbsp vinegar OR lemon juice, let stand 10 min)
4 bone-in chicken breast halves, skin removed, about 8 ounces each
1/3 C all-purpose flour
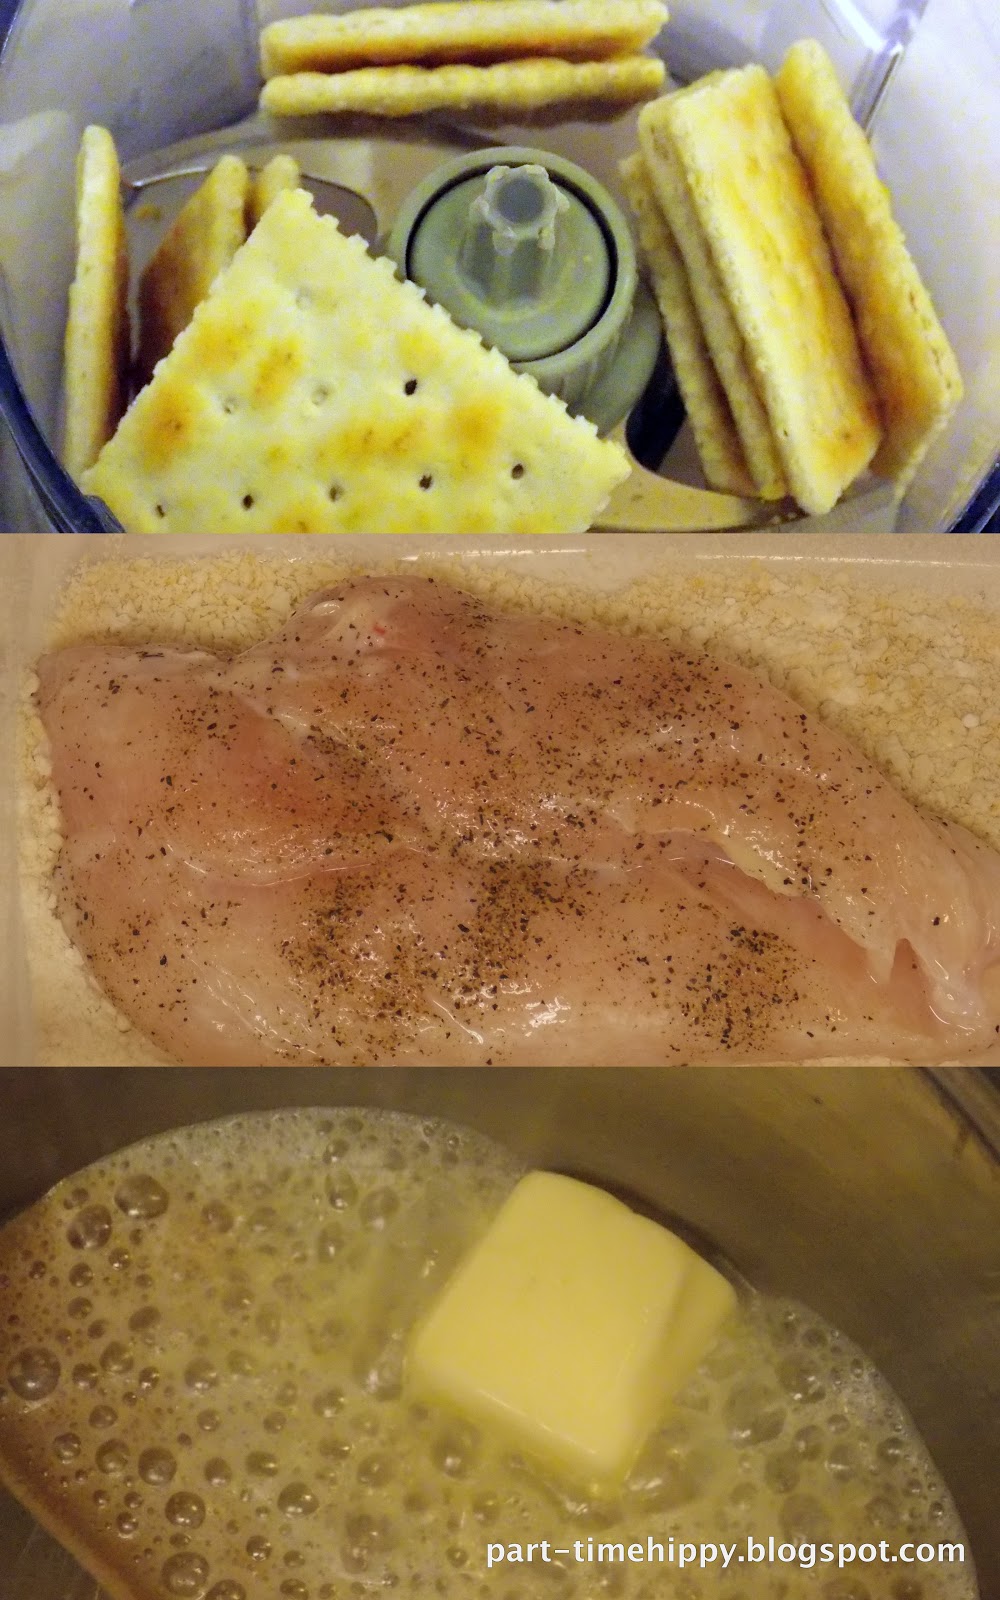
1/3 C cracker meal made by food processoring (or ziploc bag and roller pinning them) about 10 saltine crackers until finely ground
1/2 tsp salt
1/2 tsp freshly ground black pepper
2 Tbsp butter
1. Preheat oven to 425
2. To prepare chicken, combine buttermilk and chicken in a shallow dish, turning to coat.
3. Combine flour and cracker meal in a shallow dish. Transfer chicken from buttermilk to a work surface. Sprinkle chicken evenly with 1/2 tsp salt and pepper. Working with one chicken breast half at a time, dredge chicken in flour mixture, shaking off excess; set aside. Repeat procedure with remaining chicken and flour mixture.
4. Melt butter in a large ovenproof nonstick skillet over medium-high heat. Add chicken to pan, meat side down; cook 4 minutes or until golden brown. Turn chicken over, and bake at 425 for 32 minutes or until a thermometer registers 165. If you don't have an oven proof skillet, just transfer the chicken to a baking dish for the oven cooking step. Serves 4.


Printable Version
Tuesday, November 6, 2012
Quinoa Stuffed Acorn Squash

Hi friends! My name is Stephanie and I have a little food blog called Part-Time Hippy. I consider myself a part-time hippy and a full-time foodie. I'm very excited to introduce myself and share a recipe here for Danielle.
I'm originally from Idaho and currently live in Salt Lake City with my husband Dan. I recently switched from running a piano and voice studio to working as an enrollment counselor for a university. In the little spare time I have, I love hiking, backpacking, biking, thrifting, finding vintage treasures, and of course, eating delicious food.
I love food, pure and simple. I love blogging about everything from super healthy food to food full of butter and sugar. I'm so excited to share this post here on Blissful and Domestic. I have this awesome cookbook from the 80's that says "Updated for the
90's" on the front cover. It's called "Recipes to lower your fat
thermostat." Who doesn't want to do that???
Quinoa Stuffed Acorn Squash, serves 6

Ingredients:
- 1 1/2 C cooked quinoa or brown rice (Quinoa cooks like rice- simply rinse your quinoa, add 1 part quinoa to 2 parts water and bring to a boil. Once the water is boiling, turn down to a simmer and cover for about 20 minutes. The quinoa will be transparent and glassy when it is cooked)
- 1/2 C dried whole wheat seasoned bread crumbs
- 1 onion, finely chopped
- 2 egg whites, slightly beaten
- 1/2 tsp sage
- 2 tsp parsley, chopped
- 1 tsp black pepper
- 3 acorn squash

Instructions:
- Combine all ingredients except squash.
- Cut squash in half. Clean out seeds and discard them.
- Fill each squash half with quinoa or rice mixture, heaping slightly.
- Place squash in a nonstick casserole dish. Seal with foil. Bake at 350 until squash is tender, about 1 hour. Serve.

You might also like my blueberry blue cheese spinach salad, Chicken Roll Ups, Black Bean Flourless Brownies, Red Velvet Brownies, Buttermilk Oven Fried Chicken, or my Warm Quinoa Salad with Tofu and Asparagus.
Printable Version
Thanks again for letting me share today on Blissful and Domestic!
Tuesday, October 2, 2012
You asked for it: Red Velvet Brownies with cream cheeese frosting

I have received a few hints from people who read my blog- MORE EAT YOUR FEELINGS FOOD PLEASE!
I am not about to put myself on a healthy eating pedestal, but I eat very healthy most of the time. If you are a friend in real life, you know I can put unhealthy food away with the best of them, especially at a good party. I could out-eat just about anyone if called to the challenge.
Since I'm SO good at eating, I really can't have processed desserts in my house. I fully 100% with all my heart believe that the chemicals and sweeteners found in processed foods like brownie mixes and cake mixes trigger some beast inside of me and I go nuts! Don't worry, I seek professional help for these obviously ABNORMAL issues :)
For that reason you don't see a lot of treats on this blog. I also RARELY use boxed mixes. If I do, that dessert is going to a party where other people can eat it. I'm not opposed to boxed mixes, but for me, they're a no-no. I LOVE seeing other bloggers creations out of mixes and their lovely dessert creations so if you want dessert ideas, there's that thing called pinterest!
I do love myself a good brownie every now and then and knew I wanted to make some for my family party. I trust my food magazines with new recipes and went for Southern Living's Red Velvet Brownie recipe. Nothing beats a delicious homemade brownie.
These were seriously amazing. Dense. Moist. Thick. Balanced. Chewy. Slightly Tangy.
The recipe is one you stir by hand and I followed the recipe to a T except for one little tiny thing. The cute bakers on DC Cupcakes always add apple cider vinegar to anything red velvet, so I threw in a tablespoon of ACV just because.
Here is how I made these brownies:
Ingredients:
- 1 (4-oz.) bittersweet chocolate baking bar, chopped (on the back of your cocoa box you can see how to substitute cocoa and oil for chocolate)
- 3/4 cup butter
- 2 cups sugar
- 4 large eggs
- 1 1/2 cups all-purpose flour
- 1 (1-oz.) bottle red liquid food coloring
- 1 1/2 teaspoons baking powder
- 1 teaspoon vanilla extract
- 1/8 teaspoon salt
- 1 Tbsp apple cider vinegar
- 8 oz. cream cheese, softened
- 3 Tbsp butter, softened
- 1 1/2 C powdered sugar
- 1/8 tsp salt
- 1 tsp vanilla
- Preheat oven to 350°. Line bottom and sides of a 9 X 13 inch pan with aluminum foil or parchment paper allowing 2 to 3 inches to extend over sides; lightly grease foil or paper.
- Microwave chocolate and butter in a large microwave-safe bowl at HIGH 1 1/2 to 2 minutes or until melted and smooth, stirring at 30-second intervals. Whisk in sugar. Add eggs, 1 at a time, whisking just until blended after each addition. Gently stir in flour, food coloring, baking powder, and vanilla extract. Pour mixture into prepared pan.
- Bake at 350° for 25-30 minutes or until a wooden pick inserted in center comes out with a few moist crumbs. (cooking times may vary) Cool completely on a wire rack (about 2 hours).
- While brownies are cooling, beat cream cheese, butter, powdered sugar, vanilla, and salt together in a bowl. Beat until smooth and creamy.
- Lift brownies from pan, using foil sides as handles; gently remove foil. Spread Cream Cheese Frosting on top of brownies, and cut into 16 squares. Garnish, if desired.

 |
| My awesome cousin is a great sport to demonstrate how easily these can be devoured |
 |
| My other awesome cousin is laughing at me in the background while I throw all my manners out the window and eat straight from the butchers knife. |
Printable Version
Friday, September 28, 2012
Coconut Almond Butter

About a month ago I found a new food blogger that I totally have a blog crush on. Her blog name is Delighted Momma. I made her Flourless Zucchini Brownies. Twice. During the brownie party, stumbled upon her recipe for almond butter (with coconut!)
I have attempted nut butters before but always quit at the paste stage and figured homemade nut butters weren't possible. I read her instructions and realized I never ran my food processor long enough and maybe there was hope for me. You can see her recipe here.
I've made several batches of this stuff and will probably never buy store bought almond butter again. It's hard describe how delicious it is homemade.
Some have told me that soaking your almonds makes them even more nutritious. I used raw almonds for this last batch and unsweetened coconut shreds and it is delicious.
*Warning!! This is a loud and obnoxious process. Don't do it at midnight...or when your kids are napping. You'll regret it.
**WARNING!! This almond butter gets HOT. You'll see condensation on my food processor and it's for realsies hot.
Coconut Almond Butter from Delighted Momma
Ingredients:
- 2 Cups dry roasted almonds
- 1/3 C unsweetened coconut flakes
- 1/2 tsp sea salt
- Place all ingredients in a food processor. I have also made this using a Ninja.
- Turn your food processor to high and plug your ears and shut yourself in the closet while this processes for 10 minutes. If you watch, you'll noticed different stages- almond meal to almond chunks, to almond paste, and finally almond butter!
- After 10 minutes, check your almond butter. If you like it chunky, stop processing it. If you let it run longer, you'll get smooth and creamy almond butter.
- Using a rubber spatula, scrape the almond butter into an airtight container and store.


Friday, September 21, 2012
Zucchini Ribbon Salad with Sweet Corn and Avocado
What's up with the ode to Zucchini here? I was graciously given dozens of zucchini and if I don't eat them, they will rot and my house will stink. The only solution is to eat them.
I pinned this recipe after one of my favorite food bloggers, Maria at Two Peas & Their Pod posted it. The pictures were gorgeous and I wanted to have her exact salad special delivered to my house.
I admit I was a little nervous to commit to making this recipe myself because I've never had raw zucchini and I didn't want to be left with the whole salad to eat by myself if I didn't like the zucchini ribbons. I made it anyway and was so happy with the results!
I've eaten it by the bowl-full ever since I made it. Dan refers to it as my "free" salad...meaning I can gorge myself on it and not feel guilty! Don't worry, the gorging has ensued :)
The only alteration I made was using a can of sweet corn because the grocery store didn't have any ears of corn to buy. LAME. I'm sure the addition of fresh corn would make this even more delicious.
You can check out the original recipe Here on Maria's blog, and the recipe below is her original recipe.

Directions:
1. In a large bowl, whisk the olive oil and lime juice together. Season with salt and pepper, to taste.
2. Trim the ends of the zucchini and yellow squash. With a vegetable peeler, shave lengthwise into long, wide strips about 1/16 inch thick. When you get to the center of the zucchini, turn the squash over and slice from the other side until you get to the center again.
3. Put the zucchini and yellow squash ribbons in a large bowl. Cut the sweet corn kernels off of the cob, cutting close to the cob. Discard cobs. Add sweet corn, cilantro, red onion, and avocado slices to the squash ribbons. Pour olive oil and lime dressing over salad and toss until coated.
4. Crumble queso fresco over the top of the salad and season with salt and pepper, to taste. Serve and enjoy!
*I found my queso fresco by the cream cheese at my grocery store. I also used whole milk queso fresco

Printable Version
I pinned this recipe after one of my favorite food bloggers, Maria at Two Peas & Their Pod posted it. The pictures were gorgeous and I wanted to have her exact salad special delivered to my house.
I admit I was a little nervous to commit to making this recipe myself because I've never had raw zucchini and I didn't want to be left with the whole salad to eat by myself if I didn't like the zucchini ribbons. I made it anyway and was so happy with the results!
I've eaten it by the bowl-full ever since I made it. Dan refers to it as my "free" salad...meaning I can gorge myself on it and not feel guilty! Don't worry, the gorging has ensued :)
The only alteration I made was using a can of sweet corn because the grocery store didn't have any ears of corn to buy. LAME. I'm sure the addition of fresh corn would make this even more delicious.
You can check out the original recipe Here on Maria's blog, and the recipe below is her original recipe.

Zucchini Ribbon Salad with Sweet Corn and Avocado
Ingredients:
- 2 tablespoons olive oil
- 2 tablespoons freshly squeezed lime juice
- Salt and pepper, to taste
- 2 medium zucchini
- 2 medium yellow squash
- 2 ears cooked sweet corn
- ¼ cup chopped fresh cilantro
- 1/2 red onion, sliced
- 2 medium ripe avocados, peeled, pitted, and sliced
- 1/2 cup queso fresco (Mexican cheese)
Directions:
1. In a large bowl, whisk the olive oil and lime juice together. Season with salt and pepper, to taste.
2. Trim the ends of the zucchini and yellow squash. With a vegetable peeler, shave lengthwise into long, wide strips about 1/16 inch thick. When you get to the center of the zucchini, turn the squash over and slice from the other side until you get to the center again.
3. Put the zucchini and yellow squash ribbons in a large bowl. Cut the sweet corn kernels off of the cob, cutting close to the cob. Discard cobs. Add sweet corn, cilantro, red onion, and avocado slices to the squash ribbons. Pour olive oil and lime dressing over salad and toss until coated.
4. Crumble queso fresco over the top of the salad and season with salt and pepper, to taste. Serve and enjoy!
*I found my queso fresco by the cream cheese at my grocery store. I also used whole milk queso fresco

Printable Version
Subscribe to:
Posts (Atom)