Showing posts with label Main Dish. Show all posts

Saturday, November 10, 2012

Buttermilk Oven Fried Chicken


Do you remember when KFC was actually called Kentucky Fried Chicken? I remember it being a real treat to get KFC, go to the park, and have a huge picnic with my family. My dad loves fried chicken from the deli and we had a lot of summer picnics with fried chicken.

Fried chicken also always look so good on TV...everytime I watch "Man vs. Food" going to some place that makes fried chicken it makes me want to buy a deep fryer for my kitchen. That will probably never happen, so here is an enlightened, but delicious version of fried chicken.

Another hit from Cooking Light, this recipe uses cracker meal for the breading which is genius. This is a hit with bone-in chicken but you can also use boneless skinless chicken breasts if that's all you have on hand. This is a delicious "fried" chicken you can feel pretty awesome about serving since it is briefly pan-fried and then baked to perfection in the oven. The chicken tastes like the real-deal fried chicken without all the fat. I served mine with a green salad and roasted carrots with rosemary.

 Ingredients:
1 cup lowfat buttermilk (Make your own with 1 C milk, and 1 tbsp vinegar OR lemon juice, let stand 10 min)
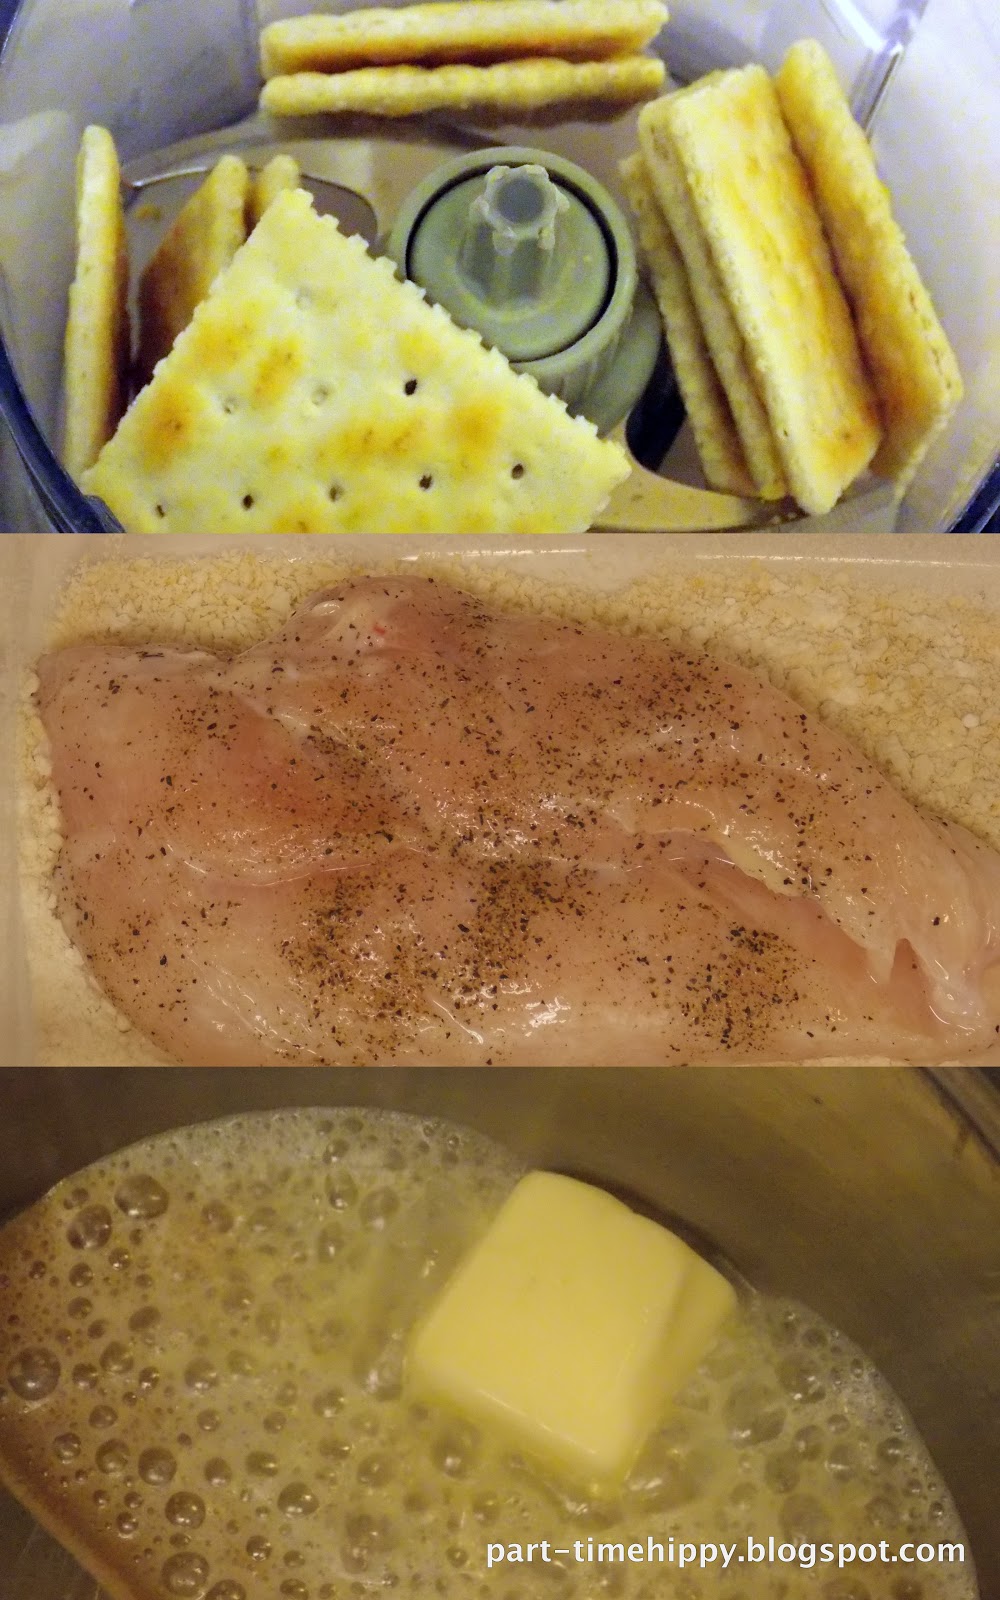
4 bone-in chicken breast halves, skin removed, about 8 ounces each
1/3 C all-purpose flour
1/3 C cracker meal made by food processoring (or ziploc bag and roller pinning them) about 10 saltine crackers until finely ground
1/2 tsp salt
1/2 tsp freshly ground black pepper
2 Tbsp butter

1. Preheat oven to 425

2. To prepare chicken, combine buttermilk and chicken in a shallow dish, turning to coat.

3. Combine flour and cracker meal in a shallow dish. Transfer chicken from buttermilk to a work surface. Sprinkle chicken evenly with 1/2 tsp salt and pepper. Working with one chicken breast half at a time, dredge chicken in flour mixture, shaking off excess; set aside. Repeat procedure with remaining chicken and flour mixture.

4. Melt butter in a large ovenproof nonstick skillet over medium-high heat. Add chicken to pan, meat side down; cook 4 minutes or until golden brown. Turn chicken over, and bake at 425 for 32 minutes or until a thermometer registers 165. If you don't have an oven proof skillet, just transfer the chicken to a baking dish for the oven cooking step. Serves 4.


Printable Version

Tuesday, November 6, 2012

Quinoa Stuffed Acorn Squash


Hi friends! My name is Stephanie and I have a little food blog called Part-Time Hippy.  I consider myself a part-time hippy and a full-time foodie. I'm very excited to introduce myself and share a recipe here for Danielle. 

I'm originally from Idaho and currently live in Salt Lake City with my husband Dan. I recently switched from running a piano and voice studio to working as an enrollment counselor for a university. In the little spare time I have, I love hiking, backpacking, biking, thrifting, finding vintage treasures, and of course, eating delicious food. 

I love food, pure and simple. I love blogging about everything from super healthy food to food full of butter and sugar. I'm so excited to share this post here on Blissful and Domestic. I have this awesome cookbook from the 80's that says "Updated for the 90's" on the front cover. It's called "Recipes to lower your fat thermostat." Who doesn't want to do that??? 

This recipe is wholesome, filling, tasty, and very inexpensive to make. This Quinoa Stuffed Acorn Squash is a great way to use up squash from your garden that's been sitting all alone on your counter.The filling reminds me of Thanksgiving stuffing and can be made with Quinoa or brown rice. Besides the baking process, this came together in about 10 minutes.

Quinoa Stuffed Acorn Squash, serves 6


Ingredients:
  • 1 1/2 C cooked quinoa or brown rice (Quinoa cooks like rice- simply rinse your quinoa, add 1 part quinoa to 2 parts water and bring to a boil. Once the water is boiling, turn down to a simmer and cover for about 20 minutes. The quinoa will be transparent and glassy when it is cooked)
  • 1/2 C dried whole wheat seasoned bread crumbs
  • 1 onion, finely chopped
  • 2 egg whites, slightly beaten
  • 1/2 tsp sage
  • 2 tsp parsley, chopped
  • 1 tsp black pepper
  • 3 acorn squash

Instructions:
  1. Combine all ingredients except squash.
  2. Cut squash in half. Clean out seeds and discard them.
  3. Fill each squash half with quinoa or rice mixture, heaping slightly.
  4. Place squash in a nonstick casserole dish. Seal with foil. Bake at 350 until squash is tender, about 1 hour. Serve.


You might also like my blueberry blue cheese spinach salad, Chicken Roll Ups, Black Bean Flourless Brownies, Red Velvet Brownies, Buttermilk Oven Fried Chicken, or my Warm Quinoa Salad with Tofu and Asparagus.
 Printable Version

Thanks again for letting me share today on Blissful and Domestic! 

Thursday, January 26, 2012

Dan's Chicken Roll Ups


One time I was trying to bridge the gap between my husband's favorite foods and my own favorite foods. He is a self-proclaimed vegetable hater and I am a lover of vegetables. He hates spicy, I love my nose to run when I eat curry. I hate boxed dinners, he loves Velveeta shells and cheese. What's a girl to do? I called my mom.


I called my mom and my grandma and wrote down every recipe that involved bread, white creaminess, cheese, and one or two vegetables. I am crazy about my husband and have found out he actually likes more foods than either of us originally thought!


This recipe series is devoted to him. He makes me laugh from the moment I wake up until the moment I fall asleep. If these chicken roll ups make him happy (I admit I can eat more of these than him because they are SO delicious) then I will fore-go my veggie medley surprise just for him. Love you babe!


This recipe is a combo of my mom's and my favorite food blogger's, The Girl Who Ate Everything

Ingredients:
Filling:

8 ounces cream cheese at room temperature

1/2 C sour cream

1/4 tsp pepper

1/2 tsp salt

1 1/2 Tbsp dried chives

1 1/2 Tbsp minced onion

2 stalks chopped celery (for veggie lovers)

2/3 C chopped or canned mushrooms (for veggie lovers)

3 C diced cooked chicken breasts


Roll Ups:

2 (8 ounce) cans of Pillsbury crescent rolls

1/4 C melted butter

2 C Italian seasoned bread crumbs


Gravy:

1 can (14.25 ounce) cream of chicken soup

1 package chicken gravy mix

3/4-1 C water


1. Preheat oven to 350 degrees. With a hand mixer, combine the cream cheese and sour cream until smooth. Add salt, pepper, dried chives, minced onion, celery, mushrooms, and diced chicken and stir until all smooth and creamy.


2. To assemble your roll ups, roll out the crescent roll triangles until they are as wide and long as possible. Fill each roll with 1/4 C of the filling and then tuck the sides around the filling and roll up towards the skinny end of the triangle, tucking as you go.


3. After rolling, dip the tops and bottoms in melted butter and then roll them around in a bowl of bread crumbs to get that yummy crunchy coating. Shake off any excess crumbs. Line them up on a greased cookie sheet as you go.


4. Bake at 350 for 20-25 minutes until golden brown.

5. Prepare the gravy in a small pot on the stove. Combine the cream of chicken soup, the chicken gravy, and 3/4-1 C water. Bring to a simmer and then keep warm until you are ready to serve warm on top of the chicken roll ups.


Printable Version


Tuesday, October 18, 2011

Quinoa Stuffed Peppers


Green peppers are really cheap at the farmer's market and of course my sense of reality gets fuzzy when I go to the farmer's market which basically equates to me thinking I can consume 16 peppers in one week. What better way to devour a green pepper than when it's stuffed with other veggies from the farmer's market??? No "wasted produce" guilt here. This recipe originally calls for couscous but I swapped it for quinoa. They were delicious, filling, and very healthy.

Adapted from ChangeOne for Diabetes

Ingredients:

6 large bell peppers (any color)
1 Tbsp olive oil
1 small zucchini, finely chopped
2 cloves garlic, minced
1 Tbsp fresh lemon juice
2 C cooked couscous (OR use cooked quinoa!)
1 can (15 ounced) chick-peas, drained and rinsed
1 ripe tomato, seeded and finely chopped
1 tsp dried oregano
1/2 tsp salt
1/4 tsp fresh-ground black pepper
1/2 C crumbled feta cheese (I used shredded parmesan bc that's what I had)

1. Slice the tops off the peppers to make lids. Scoop out the membranes and seeds and discard. Simmer the peppers and lids, covered, in a large saucepan of lightly salted boiling water for 5 minutes. Drain.


2. Preheat the oven to 350 and heat the oil in a medium saucepan over medium heat.

(This is a plug for my favorite kitchen gadget, the Vidalia Chop Wizard! See how finely chopped the zucchini is?)
Add the zucchini and garlic and saute' for 2 minutes Stir in the lemon juice. Cook for 1 minute and remove from the heat. Stir in the couscous, chickpeas, tomato, oregano, salt, and pepper. Stir in the cheese.


3. Fill each pepper with the couscous mixture and place upright in a shallow baking dish. Cover with the pepper tops and bake just until the filling is heated through, about 20 minutes.


Tuesday, October 4, 2011

Mystery Squash Rainbow Surprise and Warm Quinoa


Fall is an exquisite season. It is my favorite time of year and my favorite time to zip up my fleece jacket and head to the farmer's market on Saturday. I love seeing the old pickup trucks overflowing with pumpkins, gourds, and 3 foot long mystery squash. I picked up some mystery squash a couple weeks ago and they have been staring at me for days. I started chopping and sauteing my farmer's market veggies in some olive oil and what happened next really surprised me. I stopped eating it so I could take a picture because this dish suddenly became blog-worthy. I thought my invention would be one of those times where you eat something because it is SO good for you, not because it tasted good. This was delicious and I ate every last morsel. This is a serving for one, so adjust accordingly.

Ingredients:
1 medium sized mystery squash. I believe mine was of the zucchini family.
1/2 C chopped red cabbage
1/4 C finely chopped onion
1 Leek
1/2 C grape or cherry tomatoes, cut in half
1 tsp minced garlic
Juice of 1 lemon
1/2 C water
1/2 C cooked quinoa 

1. Wash and scrub all vegetables. Starting with the zucchini, cut lengthwise and remove large seeds. Cut each length into thin slices. Next chop the leek into thin slices, making sure to only use the white bulb and stem until you reach the long sprouting leaves.

2. Heat olive oil on medium heat and add the garlic and onion until fragrant, about a minute. Add zucchini, red cabbage, and leek and saute until soft, about 6 minutes. Add the water a little at a time while sauteing to make sure it doesn't burn. 

3. Add the cherry/grape tomatoes and the juice of the lemon and simmer covered for about 2 minutes. Allow excess liquids to reduce before serving.

6. Serve atop 1/2 C warm Quinoa 

*Quinoa cooks like rice. In a small saucepan, cover 1 C quinoa with 2 C water. Bring to a boil and then reduce heat to a simmer and cover for 20 minutes. Don't peek at it or you'll let the steam fairies escape. Fluff with a fork and serve.


Monday, June 20, 2011

BBQ Chicken Calzones


One time in my past life I worked at a bakery called Mrs. Powell's Cinnamon Rolls. It was pretty much amazing to pull fresh cinnamon rolls out of the oven in the morning and load them with frosting. Believe it or not I never got sick of any of the food there, even after 2 years of working there. To balance the sweets, we made a few savory items and one of them was called a BBQ sandwich. It was really a calzone but we called them sandwiches. These were my favorite!!! The combo of tender chopped chicken with a perfectly sweet BBQ all cooked inside fresh flaky bread dough...um yeah. Pretty good.

I've tried to recreate these with a few different dough recipes and we actually prefer the pretzel dough variation! We used our standard pretzel dough recipe for these but you could also use our pizza dough recipe. We have even made them with store bought pizza dough and they work great. 


Ingredients:

1 1/2 c warm water
1 Tbsp Sugar
2 tsp salt
2 1/4 tsp yeast (make sure it isn't too old or it won't work as well!)
4 1/2 C flour
2 ounces melted butter
10 c water
1/4 c baking soda

Or use this pizza dough recipe.


Filling:

2 standard chicken breasts

BBQ sauce of your choice, we like Sweet Baby Ray's

1-2 C FRESHLY GRATED mozzarella cheese. Pre-shredded will disappoint you...it will be gummy when it melts.


Directions:

Combine the water, sugar and kosher salt in the bowl of a stand mixer and sprinkle the yeast on top. Allow to sit for 5 minutes or until the mixture begins to foam. Add the flour and butter and, using the dough hook attachment, mix on low speed until well combined. Change to medium speed and knead until the dough is smooth and pulls away from the side of the bowl, approximately 4 to 5 minutes. Remove the dough from the bowl, clean the bowl and then oil it well with vegetable oil. Return the dough to the bowl, cover with plastic wrap and sit in a warm place for approximately 50 to 55 minutes or until the dough has doubled in size.


While the dough raises, start a pot of boiling water and boil the chicken breasts until tender. Remove from the boiling water and shred with a fork. Return to pan and add a few big squirts of BBQ sauce and combine. It should look something like this.


Preheat the oven to 450 degrees F. Line 2 half-sheet pans with parchment paper and lightly brush with the vegetable oil. Set aside.
Bring the 10 cups of water and the baking soda to a rolling boil in an 8-quart saucepan or roasting pan. (skip this step if using pizza dough)

Next, weigh your dough all together and then divide by 8. You want your calzones to be uniform and each ball of dough should roughly be 2-2.5 ounces, or whatever the weight of your dough divided by 8 is.

Take each ball of dough and roll it into a large circle, then top with a little chicken and cheese.


Gently fold over to seal the edges, then take a fork and pinch the ends together by pressing down around the edges with a fork or one of those fancy pastry wheel things.

Now, you may skip the boiling process if you are using pizza dough. BUT. If you are following the pretzel dough method, you will want to boil your calzones. We tried just brushing them with a baking soda solution and this is what happened.


They were pretty gross actually...way too much baking soda taste and it was hard to get it all even.

Carefully put each calzone in the pot of boiling water and let it cook on each side for about 30 seconds. This boiling process will give it that golden brown pretzel look and taste. The baking soda does something scientific so don't leave out the baking soda!

Transfer each calzone to the half sheet pan and once you have boiled them all, bake for 12-14 minutes.

Remove from oven and brush with melted butter or take a stick of butter and just rub the hot calzones with the butter.

Sunday, June 5, 2011

Homemade Pizza with New York Style Sauce

Cooking Light has published several pizza recipes and they are all awesome. I have tried every single one and this one is our favorite. The crust is perfectly chewy and the perfect thickness to hold all the sauce and toppings. Sorry there's no picture yet for this one...I'm kind of on a pizza strike for awhile until I get a little more weight off. Don't worry, I'll get there soon and then I'll make this and take a picture. I've made this a zillion times and can confidently tell you it's the bomb for pizza. The sauce is divine. You won't ever want to use a bottled pizza sauce ever again. If you want a real picture, visit the Cooking Light Site

Ingredients:

Pizza Crust
1 package active dry yeast ( 2 1/4 tsp. If your yeast is too old, it won't work as well. I keep mine in the freezer for this purpose)
1 C warm water
1 1/4 C cold water
2 Tbsp olive oil
1 tsp sugar
1 tsp salt
26.1 ounces (5 1/2 C) unbleached bread flour, divided. (I've used all-purpose and it still works)
Cooking Spray
*I have made this with whole wheat flour and if you choose to do so, use about 4 C white flour and 1 1/2 C white flour for some volume to the crust

New York-Style Pizza Sauce

7 Tbsp water
2 Tbsp chopped fresh basil (fresh makes all the difference in the world, but use what you have)
1 1/2 Tbsp extra-virgin olive oil
2 tsp dried oregano (be sure to crush the dried spices in your hands to release the flavor)
1 1/2 tsp sugar
1 tsp minced garlic
1 (14.5 ounce) can petite-diced tomatoes, undrained
1 (6 ounce) can tomato paste

Just combine all these ingredients in a bowl with a whisk, makes 2 2/3 C.

1. Preheat Oven to 500. Dissolve yeast in 1 C warm water in a small bowl by sprinkling the yeast on top of the water and then leaving it alone; let stand 5 minutes. Combine 1 1/4 C cold water, oil, sugar, and salt in a small bowl and stir with a whisk.

2. Weight or lightly spoon 5 1/4 C (24.9 ounce) flour and combine with yeast mixture, and cold water mixture in a bowl of a stand mixer fitted with a dough hook. Mix on low for 8 minutes or until dough begins to form. Let rest 2 minutes. mix on low 6 minutes or until dough is smooth. Turn dough out onto floured surface. Knead until smooth and elastic (about 2 minutes); add enough of the remaining 1.19 ounces (about 1/4 C) flour, 1 Tbsp at a time to prevent dough from sticking to hands.

3. Divide the dough in half. If using both balls of dough, roll out on a flat surface to a 12 inch circle. Place on a pizza dough on prepared pizza stone and brush with olive oil. Top with sauce, leaving a 1/4 inch border. Repeat with remaining dough or place remaining dough in a heavy duty zip top bag and freeze for up to 2 months.

4. Top pizza with toppings and then bake for 12 minutes. Let the pizza rest for 5-6 minutes before serving.

Saturday, June 4, 2011

Beef Stroganoff that your husband could make

One time I asked my awesome husband to make dinner while I was driving home from a long day of teaching. I had everything prepared, and all he had to do was listen to the sound of my voice (using a bluetooth hands-free device of course) while I talked him through it during my drive home. Let's just say he was a little freaked out when I told him he would be making beef stroganoff.

He was a champ! It turned out great and if he can make it, anyone can make it! I've adapted this from Cooking Light because I actually prefer ground beef in my stroganoff and the original recipe calls for sirloin steak.  It also calls for fresh mushrooms but I use canned when I'm in a pinch. I will say that this isn't your cream of condensed soup version and will require more than 4 ingredients, but it is well worth it. This recipe is full of flavor without all the calories and fat of regular stroganoff.

Ingredients:


1 pound leanest beef you can afford. If you are rich, use 1 pound boneless sirloin steak, trimmed.
Cooking spray
3 cups sliced mushrooms, about 8 oz (I've used a couple cans of mushrooms)
1/2 C chopped onion
1 Tbsp butter
2 Tbsp flour
1 C fat free, less-sodium beef broth
1/2 tsp salt
1/8 tsp fresh ground pepper
3/4 C reduced fat sour cream
4 C hot cooked egg noodles (8 oz uncooked)
3 Tbsp minced fresh flat-leaf parsley

1. Brown ground beef for 2-3 minutes OR if you are rich, cut the beef diagonally across the grain into 1/4 inch wide strips, and then cut the strips into 2 inch pieces and then brown in a nonstick pan for 2-3 minutes.

2. Remove beef from pan and place in a medium bowl, and keep warm. Add mushrooms and onion to pan and saute 4 minutes. Add mushroom and onion mixture to beef.

3. Melt butter in pan over medium heat. Add flour. Cook 1 minute, stirring with a whisk. Gradually add broth, stirring constantly. Cook 1 minute or until thickened and bubbly, stirring constantly.

4. Add beef mixture, salt, and pepper to pan and bring to a boil. reduce heat, and simmer 4 minutes. remove from heat and let stand 30 seconds. Stir in sour cream. combine cooked noodles and minced parsley, and serve beef mixture over noodles. Serves 6.