Saturday, June 25, 2011

Warm Quinoa salad with tofu and asparagus


Asparagus is by FAR my favorite vegetable. When Sunflower Market had it on sale for only $1.27 a pound this week, I bought 8 bunches because I know I will probably have to wait until next Spring before it goes on sale again. I would also classify quinoa as one of my favorite grains so a salad with both my favorites foods and a few other star foods like sun-dried tomatoes, lemon, garlic, and tofu is the best thing I've eaten in a long time. I used my Whole Foods cookbook as a guide but since I deviated from the original so far, I had to rename the recipe! This recipe is for a single serving so adjust accordingly.

Printable Version

Ingredients:
2 tsp olive oil
1/4 sun-dried tomatoes
1/4 C frozen peas
5-8 spears of asparagus, woody ends discarded, cut into 1 inch pieces
1/2 C cooked quinoa (May be cooked in chicken broth for extra flavor)
1-2 tsp minced garlic, the fresher the better!
1-4 tsp lemon zest, you decide
1-2 Tbsp fresh lemon juice
1/4 block of extra firm tofu, diced. 1/4 block should equal 1 serving according to the package
Salt and Pepper to taste

1. To cook your quinoa, rinse your quinoa thoroughly to get rid of the bitter coating. After rinsing, place in a pot and cover with double amounts of water. It cooks similar to rice so if you have 1 C of quinoa, cover with 2 C water. Bring to a boil then turn heat down to low and cover for 20 minutes and don't peek or you'll let the precious steam out! This recipe works well with savory quinoa, so cooking in chicken broth instead of water would work too.

2. In medium skillet, saute the garlic in the olive oil on medium-high until fragrant. Add the sun-dried tomatoes. Add the lemon zest and lemon juice, cook 1-2 minutes.

3. Add chopped tofu and cook until almost browned, about 4 minutes.

4. Reduce heat to medium-ish and add the chopped asparagus and frozen peas. Cover and let cook until the asparagus is tender but not wilted.


5. Add cooked quinoa and stir until all combined. Continue cooking for about 1 minute. Salt and Pepper to taste and serve immediately.

Monday, June 20, 2011

BBQ Chicken Calzones


One time in my past life I worked at a bakery called Mrs. Powell's Cinnamon Rolls. It was pretty much amazing to pull fresh cinnamon rolls out of the oven in the morning and load them with frosting. Believe it or not I never got sick of any of the food there, even after 2 years of working there. To balance the sweets, we made a few savory items and one of them was called a BBQ sandwich. It was really a calzone but we called them sandwiches. These were my favorite!!! The combo of tender chopped chicken with a perfectly sweet BBQ all cooked inside fresh flaky bread dough...um yeah. Pretty good.

I've tried to recreate these with a few different dough recipes and we actually prefer the pretzel dough variation! We used our standard pretzel dough recipe for these but you could also use our pizza dough recipe. We have even made them with store bought pizza dough and they work great. 


Ingredients:

1 1/2 c warm water
1 Tbsp Sugar
2 tsp salt
2 1/4 tsp yeast (make sure it isn't too old or it won't work as well!)
4 1/2 C flour
2 ounces melted butter
10 c water
1/4 c baking soda

Or use this pizza dough recipe.


Filling:

2 standard chicken breasts

BBQ sauce of your choice, we like Sweet Baby Ray's

1-2 C FRESHLY GRATED mozzarella cheese. Pre-shredded will disappoint you...it will be gummy when it melts.


Directions:

Combine the water, sugar and kosher salt in the bowl of a stand mixer and sprinkle the yeast on top. Allow to sit for 5 minutes or until the mixture begins to foam. Add the flour and butter and, using the dough hook attachment, mix on low speed until well combined. Change to medium speed and knead until the dough is smooth and pulls away from the side of the bowl, approximately 4 to 5 minutes. Remove the dough from the bowl, clean the bowl and then oil it well with vegetable oil. Return the dough to the bowl, cover with plastic wrap and sit in a warm place for approximately 50 to 55 minutes or until the dough has doubled in size.


While the dough raises, start a pot of boiling water and boil the chicken breasts until tender. Remove from the boiling water and shred with a fork. Return to pan and add a few big squirts of BBQ sauce and combine. It should look something like this.


Preheat the oven to 450 degrees F. Line 2 half-sheet pans with parchment paper and lightly brush with the vegetable oil. Set aside.
Bring the 10 cups of water and the baking soda to a rolling boil in an 8-quart saucepan or roasting pan. (skip this step if using pizza dough)

Next, weigh your dough all together and then divide by 8. You want your calzones to be uniform and each ball of dough should roughly be 2-2.5 ounces, or whatever the weight of your dough divided by 8 is.

Take each ball of dough and roll it into a large circle, then top with a little chicken and cheese.


Gently fold over to seal the edges, then take a fork and pinch the ends together by pressing down around the edges with a fork or one of those fancy pastry wheel things.

Now, you may skip the boiling process if you are using pizza dough. BUT. If you are following the pretzel dough method, you will want to boil your calzones. We tried just brushing them with a baking soda solution and this is what happened.


They were pretty gross actually...way too much baking soda taste and it was hard to get it all even.

Carefully put each calzone in the pot of boiling water and let it cook on each side for about 30 seconds. This boiling process will give it that golden brown pretzel look and taste. The baking soda does something scientific so don't leave out the baking soda!

Transfer each calzone to the half sheet pan and once you have boiled them all, bake for 12-14 minutes.

Remove from oven and brush with melted butter or take a stick of butter and just rub the hot calzones with the butter.

Sunday, June 19, 2011

Rainbow Cupcakes


I have seen these rainbow cupcakes all over the blog world and finally tried them. They were so much easier than I thought they would be and most importantly, were the most delicious creation I have ever made from a cake mix. I used the recipe over at The Girl Who Ate Everything because she is my favorite food blogger even if we are strangers. The secret ingredient to these is sour cream. I've seen sour cream in cakes before but I was unaware of the power of sour cream until now. Don't ever make a boxed cake without sour cream again, alright?


Ingredients:

1 WHITE cake mix, (I used vanilla)
2 Eggs
1 cup sour cream, I used light sour cream in my version
1/2 C milk
1/3 C vegetable oil OR my version uses 1/3 C unsweetened apple and I promise it won't compromise the taste or texture!

1. Combine all ingredients until all incorporated and then mix on medium-high speed for 3 minutes.

2. Separate the batter into five bowls, and then add the food coloring of your choice to each bowl. Mix well or else your batter will come out with uneven color swirls. I have heard the Wilton gel colors are the brightest  and bestest but I used the liquid drop kind and it was OK, not great, but OK.

3. Line about 15-17 cupcake tins with cupcake paper. To figure out how much batter goes in each cup, add water by the tablespoonful until it's filled and then use that as a guide so your colors are all even. 

4. Using a tablespoon or mini ice cream scoop, scoop batter into cupcake tin, using one color at a time. After each plop of the batter, dip your finger in water and then spread the batter out flat before adding the next color, this gives it a nice stripe.

5. Repeat with remaining colors and bake according to the boxed directions. Use the ol' toothpick trick to make sure they are cooked all the way through. If the toothpick comes out clean, they're done!

6. Let the cupcakes cool and then frost! I used a butter almond frosting which is made with:


  1. 1 stick of softened butter
  2. 1 teaspoon almond extract
  3. 1-4 tablespoons of milk
  4. 3-5 cups of powdered sugar.
  5. Beat all these ingredients, adding powdered sugar a little at a time and then save the milk for the very last so it gets to the perfect consistency. These are approximate measurements and each time I make it, I use a little more or less of the milk and powdered sugar.

Sunday, June 12, 2011

Black-Bean Flourless Decadent Brownies


Black Beans in BROWNIES? Yes, it's true. I've heard of avocado in raw chocolate pies, which BTW I am going to try one of these days, but black beans in brownies was a new concept to me.

I found this recipe on my Whole Foods app and must say I was very impressed. They are very moist and very delicious. I didn't make any changes to this recipe in terms of main ingredients, but I did leave out the walnuts. If I was going to make over this recipe, I would try cutting out some of the sugar....but that's a tough one because sugar adds body and volume to the recipe so it may take a few experiments to get the texture right. Any ideas on a sugar replacement that doesn't mess up the texture?

Here you have it!

Ingredients:
1 can (15 ounce) black beans, (no salt added preferably) rinsed and drained
3 large eggs
1/3 cup melted butter
1/4 cup cocoa powder
1/8 tsp salt
2 tsp vanilla extract
1/2 C plus 2 Tbsp sugar
1/2 C semi-sweet chocolate chips
1/3 C chopped walnuts (if you prefer)

1. Preheat Oven to 350. In a food processor, combine all ingredients except nuts and chocolate chips. Process until smooth. Remove blade and scrape sides and blade.

2. Add chocolate chips and walnuts and stir with a spoon until combined

3. Add mixture to a buttered, cooking sprayed, however you want to do it 8-inch baking pan

4. Bake for 30-35 minutes or until the center is set. Cool before cutting or serving.

Printable Version

Serves:16

Calories: (W/O Walnuts) 122, W/Walnuts- 160
Fat: 7g                                       9g
Carbs: 14g                                 17g
Sugar: 10g                                 12g
Fiber: 2g                                     2g
Protein: 4g                                  4g

Sunday, June 5, 2011

Homemade Pizza with New York Style Sauce

Cooking Light has published several pizza recipes and they are all awesome. I have tried every single one and this one is our favorite. The crust is perfectly chewy and the perfect thickness to hold all the sauce and toppings. Sorry there's no picture yet for this one...I'm kind of on a pizza strike for awhile until I get a little more weight off. Don't worry, I'll get there soon and then I'll make this and take a picture. I've made this a zillion times and can confidently tell you it's the bomb for pizza. The sauce is divine. You won't ever want to use a bottled pizza sauce ever again. If you want a real picture, visit the Cooking Light Site

Ingredients:

Pizza Crust
1 package active dry yeast ( 2 1/4 tsp. If your yeast is too old, it won't work as well. I keep mine in the freezer for this purpose)
1 C warm water
1 1/4 C cold water
2 Tbsp olive oil
1 tsp sugar
1 tsp salt
26.1 ounces (5 1/2 C) unbleached bread flour, divided. (I've used all-purpose and it still works)
Cooking Spray
*I have made this with whole wheat flour and if you choose to do so, use about 4 C white flour and 1 1/2 C white flour for some volume to the crust

New York-Style Pizza Sauce

7 Tbsp water
2 Tbsp chopped fresh basil (fresh makes all the difference in the world, but use what you have)
1 1/2 Tbsp extra-virgin olive oil
2 tsp dried oregano (be sure to crush the dried spices in your hands to release the flavor)
1 1/2 tsp sugar
1 tsp minced garlic
1 (14.5 ounce) can petite-diced tomatoes, undrained
1 (6 ounce) can tomato paste

Just combine all these ingredients in a bowl with a whisk, makes 2 2/3 C.

1. Preheat Oven to 500. Dissolve yeast in 1 C warm water in a small bowl by sprinkling the yeast on top of the water and then leaving it alone; let stand 5 minutes. Combine 1 1/4 C cold water, oil, sugar, and salt in a small bowl and stir with a whisk.

2. Weight or lightly spoon 5 1/4 C (24.9 ounce) flour and combine with yeast mixture, and cold water mixture in a bowl of a stand mixer fitted with a dough hook. Mix on low for 8 minutes or until dough begins to form. Let rest 2 minutes. mix on low 6 minutes or until dough is smooth. Turn dough out onto floured surface. Knead until smooth and elastic (about 2 minutes); add enough of the remaining 1.19 ounces (about 1/4 C) flour, 1 Tbsp at a time to prevent dough from sticking to hands.

3. Divide the dough in half. If using both balls of dough, roll out on a flat surface to a 12 inch circle. Place on a pizza dough on prepared pizza stone and brush with olive oil. Top with sauce, leaving a 1/4 inch border. Repeat with remaining dough or place remaining dough in a heavy duty zip top bag and freeze for up to 2 months.

4. Top pizza with toppings and then bake for 12 minutes. Let the pizza rest for 5-6 minutes before serving.

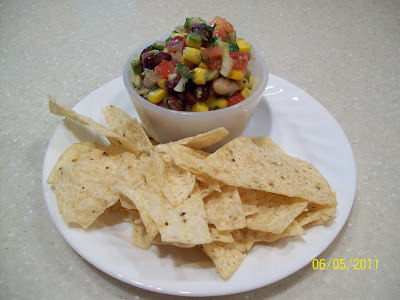
Cowboy Caviar


I saw this recipe on one of my absolute FAVORITE food blogs, called The Girl Who Ate Everything, and it's called Cowboy Caviar. I had been wanting an excuse to make this for a long time and finally had a party where I need a side dish. The flavors are incredible and it's perfect for a snack, a BBQ, or a party. I modified it a bit because I didn't have shoepeg corn or black eyed peas. I used white beans in place of the black eyed peas and used Kraft Light Zesty Italian Dressing for a little less calories. It was a HIT! If you have my favorite kitchen gadget, the Vidalia Onion Chop Wizard, you can have this ready in no time.


Cowboy Caviar
from Sheri Denney 

1 can black eyed peas, drained and rinsed
1 can black beans, drained and rinsed
1 can shoepeg corn, drained and rinsed
4-5 Roma tomatoes, seeds removed and diced
2-3 diced avocados, ripe but still firm
4 green onions, sliced thin (I used 1/2 purple onion diced finely because that's all I had)
around 1/2  to 3/4 cup Zesty Italian dressing
1/2 bunch cilantro, chopped finely
1-2 limes
ground pepper and salt to taste

Drain and rinse the black eyed peas, black beans, and corn. Add to a large bowl. Dice the tomatoes, making sure the seeds and insides are removed. You want to do this to make sure that there isn't too much liquid in the dip. Add the diced tomatoes and cilantro to the bowl. Slice the green onions finely (or purple onion) and add to the bowl. Dice the avocado and squeeze a little of the lime juice over the avocados so they don't brown as quickly. Squeeze the rest of the lime juice into the bowl. Add the Italian dressing and stir to coat all the ingredients. Add salt and pepper to taste.

Chill in the refrigerator until cold and flavors have marinated together. This is best served the same day as prepared. Serve with tortilla chips


Saturday, June 4, 2011

Beef Stroganoff that your husband could make

One time I asked my awesome husband to make dinner while I was driving home from a long day of teaching. I had everything prepared, and all he had to do was listen to the sound of my voice (using a bluetooth hands-free device of course) while I talked him through it during my drive home. Let's just say he was a little freaked out when I told him he would be making beef stroganoff.

He was a champ! It turned out great and if he can make it, anyone can make it! I've adapted this from Cooking Light because I actually prefer ground beef in my stroganoff and the original recipe calls for sirloin steak.  It also calls for fresh mushrooms but I use canned when I'm in a pinch. I will say that this isn't your cream of condensed soup version and will require more than 4 ingredients, but it is well worth it. This recipe is full of flavor without all the calories and fat of regular stroganoff.

Ingredients:


1 pound leanest beef you can afford. If you are rich, use 1 pound boneless sirloin steak, trimmed.
Cooking spray
3 cups sliced mushrooms, about 8 oz (I've used a couple cans of mushrooms)
1/2 C chopped onion
1 Tbsp butter
2 Tbsp flour
1 C fat free, less-sodium beef broth
1/2 tsp salt
1/8 tsp fresh ground pepper
3/4 C reduced fat sour cream
4 C hot cooked egg noodles (8 oz uncooked)
3 Tbsp minced fresh flat-leaf parsley

1. Brown ground beef for 2-3 minutes OR if you are rich, cut the beef diagonally across the grain into 1/4 inch wide strips, and then cut the strips into 2 inch pieces and then brown in a nonstick pan for 2-3 minutes.

2. Remove beef from pan and place in a medium bowl, and keep warm. Add mushrooms and onion to pan and saute 4 minutes. Add mushroom and onion mixture to beef.

3. Melt butter in pan over medium heat. Add flour. Cook 1 minute, stirring with a whisk. Gradually add broth, stirring constantly. Cook 1 minute or until thickened and bubbly, stirring constantly.

4. Add beef mixture, salt, and pepper to pan and bring to a boil. reduce heat, and simmer 4 minutes. remove from heat and let stand 30 seconds. Stir in sour cream. combine cooked noodles and minced parsley, and serve beef mixture over noodles. Serves 6.

Spicy Chicken Sandwiches with Cilantro-Lime Mayo, can be GF

I could eat these sandwiches everyday. They are so good! They have a nice crunch since they are coated in tortilla chip crumbs. They are the perfect alternative to a big fried chicken cutlet sandwich. These can easily be made GF if you use the right tortilla chips and use your own GF bun!

Mayo
1/4 C reduced fat mayo
2 Tbsp chopped fresh cilantro
1 tsp fresh lime juice
1 garlic clove, minced

Chicken
1/4 C egg substitute (or 1 egg beaten)
3 Tbsp hot sauce such as Tabasco or Chalula (cut this ingredient if you don't like heat)
1 tsp dried oregano
1/2 tsp salt
2 boneless skinless chicken breasts, about 6 ounces each
6 C tortilla chips
2 Tbsp olive oil

Garnish
4 kaiser rolls or bun of your choice
12 red onion slices
4 lettuce leaves

1. To prepare the mayo, combine the first 4 ingredients. (I know, rocket science eh?)

2. To prepare chicken, combine egg substitute, hot sauce, oregano, and salt in a large zip top plastic bag. Cut chicken breast halves in half horizontally to form 4 cutlets. Add chicken to bag; seal. Marinate in refrigerator 2 hours or up to 8 hours, turning bag occasionally.

3. Place tortilla chips in a food processor and process 1 minute or until ground. Place ground chips in a shallow dish.

4. Working with one cutlet at a time, remove chicken from marinade, allowing excess to drip off. coat chicken completely in chips. Set aside. Repeat with remaining chicken and chips.

5. Heat a large skillet over medium heat. Add olive oil to pan, swirling to coat. add chicken to pan, cook 3 minutes on each side or until browned and done. Spread mayo evenly over cut sides of rolls. Layer bottom half of each roll with 3 onion slices, 1 lettuce leaf, and 1 chicken cutlet and top with top halves of rolls. Serves 4.

Grilled Spice Rubbed Roast Chicken

I'm a total Cooking Light Junkie. Every time I know a new issue is about to pop up in my mailbox, I watch for the mailman and as soon as he drives up I storm his little mailman box car and start demanding my magazine. Ok, not really, but you'll find many recipes from there on this blog. This recipe is adapted from Cooking Light.

Chicken is way better when you buy it bone-in. Yeah, those boneless skinless cooking breasts are everyone's quick dinner best friend, but chicken with bones = moist, tender, flavorful deliciousness. This Grilled Spice Rubbed roast chicken is amazing and if you're into gravy, you can make a little gravy out of the drippings and serve with some mashed potatoes.

Ingredients:


1 1/2 tsp brown sugar
1 1/4 tsp ground cumin
1 tsp kosher salt
1/2 tsp freshly ground black pepper
1/2 tsp paprika
1/2 tsp dried thyme
1/2 tsp chili powder
1 (4-pound) whole chicken
Cooking spray.

If you have a BBQ grill, the following recipe involves putting some grill marks on the chicken for about 15 minutes. If you don't have a BBQ grill, just roast in the oven or even put in the crockpot as described below. Back to the BBQ- go heat it up now!

1. Combine first 7 ingredients and set aside.

2. Remove and discard giblets and neck from chicken (my FAVORITE part!). Trim excess fat. Place chicken, breast side down, on a cutting surface. cut chicken in half lengthwise along backbone, cutting to, not not through, other side. turn chicken over. Starting at neck cavity, loosen skin from breast and drumsticks by inserting fingers, gently pushing between skin and meat. Rub spice mixture under skin. Gently press skin to secure.

3. Place chicken, breast side down, on grill rack coated with cooking spray over direct heat; cover and cook 7 minutes. Turn chicken over; cook 7 minutes. If you are fancy and have a big grill, move chicken to an area with indirect heat, cover, and cook for 45 minutes. If you are me, bring back in the house, and throw it in the oven at 350 degrees until a thermometer inserted registers 165 degrees. (About 40 minutes). If you are REALLY short on time, throw that bad boy chicken in the crockpot while you're out and about, making sure to add a couple cups of water or chicken broth to the crock pot to help it steam.

4. Once the chicken reaches 165 degress via any cooking method, it's dinner time!

Lemon Lime Bars


These lemon lime bars will knock your socks off. The crust is rich and buttery and the lemon and lime zest add an extra kick and chewiness. They are tart and sweet and a perfect twist on a classic. Be careful, you might just eat the whole pan. These are from the wonderful Whole Foods Market Cookbook.

Ingredients:


2 C all-purpose flour, sifted, plus 1/4 C
1/2 C powdered sugar
1/2 pound (2 sticks) butter
4 eggs, beaten
2 C granulated sugar
3 Tbsp lemon juice
3 Tbsp lime juice
1 tsp grated lemon zest
1 tsp grated lime zest
1 tsp baking powder
powdered sugar for dusting

Preheat oven to 350.

Sift the 2 cups of flour and powdered sugar together. Cut the butter into the flour and sugar until the mixture looks like coarse meal. Press into a 13X9X2-inch pan. Bake for about 20 minutes, or until lightly browned. Remove the pan from the oven.

In a medium bowl, beat the eggs, granulated sugar, and lemon and lime juices and zests for 1 to 2 minutes, until frothy. (mmmm frothy) Sift the remaining 1/4 cup flour and baking powder togehter and stir it into the egg mixture. Pour over the baked crust. Bake for 20 to 25 minutes, until set. Remove from the oven, and allow it to cool. sift the additional powdered sugar over the top, and cut the lemon-lime dessert into squares. Makes 18 bars.

Great Grandma Dee's Banana Cake


My Great Grandma Dee's banana cake tastes like a delicious moist banana bread cupcake with buttery banana-y frosting that may send you into a wonderful glucose coma. It is so moist and so perfectly sweet, it's definitely a must-try.

Ingredients:

CAKE
3/4 C canola oil OR Butter (I use 1/2 cup unsweetened applsauce and 1/4 oil, but the ORIGINAL calls for 3/4 c butter. Just FYI I think oil makes any homemade cake way more moist than butter, it's your call. The combo of applesauce is divine and doesn't compromise texture or flavor)
1 1/2 C sugar
1 3/4 C flour
2 eggs, beaten
4 Tbsp buttermilk or sour milk made by adding a teaspoon of vinegar or lemon juice to your 4 Tbsp milk
1 tsp baking soda
1 tsp salt
1/2 C water
1 C walnuts
1 C banana pulp (about 3-4 very ripe mashed bananas)

ICING
1 Tbsp shortening
1 Tbsp butter
1 tsp lemon extract
1/4 tsp salt
2 C powdered sugar
1 ripe mashed banana

Combine fat of your choice (oil, butter, applesauce combo) with sugar. Add beaten eggs and flour, and mix until well combined.

Add the remaining ingredients and save the banana pulp addition for very last. Mix well.

Bake in an angle food or bunt pan for 1 hour in 350 degree oven. Be sure to coat your pan well with nonstick cooking spray.

After cake has been baked, remove from pan and let cool. If you frost it too soon, yours will turn out like my lovely cake in this picture. So delicious but not so pretty for presentation. I guess I just got excited.